


You can send any campaign you create in your account as an email. You can send it as many times as you want, and to any contacts in your Subscribers. You will also be able to send an existing campaign from your mobile device.
- If you haven’t already, log in to your Email Marketing account. (Need help logging in?)
- Find your campaign on the Campaigns page, and click the Send button underneath the thumbnail.
Note: If you’re sending directly from the Composer, just click the Continuebutton in the bottom right corner of the composer page.
Recipients Tab
- You have two methods of selecting people to send to:
- Send to individuals field: If you want to send a test to just yourself, or a few folks who aren’t collected in a list, just type them here farmbrazil.com.br/. This field is optional.
Note: Anyone added to the Send to individuals field who is NOT already a member of your Subscribers will be added to your All subscribers list, when you send.
- Subscriber lists: Click Include next to any list you want to send your email to. Click Exclude next to any list you want to make sure the email does not send to. Read more about excluding lists, here.
Note: You can confirm your list selections on the right side of the page.
- Send to individuals field: If you want to send a test to just yourself, or a few folks who aren’t collected in a list, just type them here farmbrazil.com.br/. This field is optional.
- Click Continue.
Details Tab
- Edit the following options, to your liking.
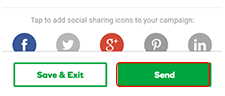
Option Details From Name This will default to your account name, the first time you send any email. For all subsequent sends, it will default to the last name you used. You can edit this each time you send. From Email This will default to your account email, the first time you send any email. For all subsequent sends, it will default to the last email you used. You can edit this each time you send. Subject This will default to the Campaign Title, the first time you send a mailing for any campaign. Any subsequent sends will default to the subject line previously sent. Second Send… This is optional. If you select this option, your email will automatically send again, in 72 hours, to anyone who did not open the first email, using the secondary subject line you enter. Don’t send this to people who already received it This is optional. If you select this option, people who have received this campaign before, will not be sent this email. Read more about this option. Enable link tracking Make sure this is selected. This allows Email Marketing to report back to you the details of what happened with your emails. Usually you don’t want to turn this off, since you won’t receive any statistics reporting if link tracking is disabled. Read more about mailing statistics, here. Make my email look awesome on all devices This is optional. Your email will be responsive with this option selected. Social sharing Select the social platforms you want to include in the sharing buttons, at the top of your email. These buttons allow your readers to like, tweet, pin, and +1 your campaign. - Click the Send button when everything looks good. But don’t worry! Your campaign will not send, yet — you have another chance to confirm all the details.
- Here’s your final chance to look everything over. All your recipient and mailing details are displayed for you, together, in one place. Click Looks good. Send it! to get your mailing on its way klikk på denne linken nå.
Note: If you need to make any changes to these details, click the Cancel link in the bottom left corner.
Send from a mobile device
You can resend an existing campaign from your mobile device.- Once you’re logged into your Email Marketing account, locate the campaign you want to resend.
- Tap Send Again to access the campaign.
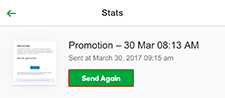
- Enter the email address to where you would like to resend the campaign to.

- Tap Send to resend your campaign.
Next step
- Learn all about the email marketing stats you can use to analyze your mailings.
You can manage your email plans and addresses using the Workspace Control Center.
- Log in to your Workspace Email account and open your product. (Need help logging in?)
- Click View Email.
- From the Tools menu, select View All Email Plans.
Note: To rename an Email Plan, in the View By menu on the right, click Plans, click All Plans, and then click on the name of the Email Plan you want to rename. Then, at the top of the Email Address list for the selected plan, on the right side, click Rename. In the Plan Name field, enter a new name for the selected Email Plan.
- Expand the email plan that contains the address(es) you want to manage.
- Use the checkboxes to select the address(es) you want to manage.
- Optional: Next to the plan name, click Add Account to add a new email address to the Email plan.
- Mouse over an email address to access the options menu, where you can:
- Change password
- Switch accounts
- Delete the address
- Access the Email Setup Center
- Edit the email address settings
While you shouldn’t normally have to worry about emails getting through with Email Marketing, some domains only allow email from manually whitelisted senders. So, these recipients may need to whitelist emails from Email Marketing, for improved delivery.
Depending on their requirements, you may need to give your recipients:
- the From Email that you use to send the email
- Email Marketing’s IP addresses farmbrazil.com.br/
- domains that your email is sent from
Servers and IP addresses:
These are all the IP addresses that your email may be sent through:
| IP range | Included IPs |
|---|---|
| 198.71.244.0/25 | 198.71.244.0 through 198.71.244.127 |
| 198.71.245.0/25 | 198.71.245.0 through 198.71.245.127 |
| 198.71.246.0/25 | 198.71.246.0 through 198.71.246.127 |
| 198.71.247.0/25 | 198.71.247.0 through 198.71.247.127 |
| 198.71.253.0/24 | 198.71.253.0 through 198.71.253.255 |
| 198.71.254.0/24 | 198.71.254.0 through 198.71.254.255 |
| 198.71.255.0/24 | 198.71.255.0 through 198.71.255.255 |
Domains
All mail will have the sending domain format m##.cmdr.buydomains.com.ph.
Follow along here to use your Autorseponder feature to create a completely automated Welcome Email, that will send to anyone who signs up through your signup form. Exciting! To get started, Log in to your Email Marketing account. (Need help logging in?), and then do the following: 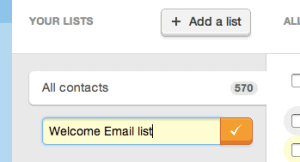
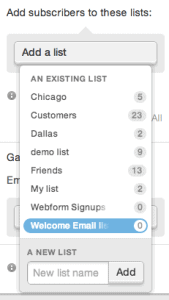 Click on the Add a list dropdown on the right, and choose your new Welcome Email list. Email Marketing will automatically save this change, and you can see that the list has been added right there on the page. Pro tip: You can create a new list for your Subscribers, right here, using the A New Listfield, at the bottom of that dropdown. You will want to make sure to get this signup form out to the world, so people can use it to sign up for your mailings! You can publish the form on your website, or just share the form URL, or connect it with your Facebook business page.
 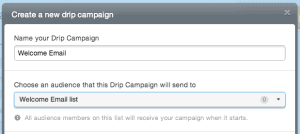 Click on the New Autoresponder button and specify the details asked on that page. In this case, I’ve called it “Welcome Email”. Make sure to select the new list that you connected to your signup form, in the previous step. And, you also want to tick the checkbox that’s called “Send the first mailing immediately after a user signs up.” This way Email Marketing will always send the Welcome Email just as soon as the person signs up through your signup form. Now, create the campaign and then design that welcome email! (Hint: It’s exactly the same as composing a regular Email Marketing campaign.) When it’s all perfect, we’re ready for the next step…
Step 1. Create your Welcome Email list.
This is in your Subscribers area. Just click on the Subscribers tab, and then on the Add a list button. Call the list whatever you like, but make sure it’s something you’ll recognize, later. We’ll call it “Welcome Email list” for this demo. Click the checkmark button, to save your list. Step 2. Create your Signup Form.
Ok, now we have to set up the signup form that you’re going to use. If you already have one, great! Just click on Signup Forms at the top of the page, and then on Edit under the specific signup form you want to play with. Click on the Add a list dropdown on the right, and choose your new Welcome Email list. Email Marketing will automatically save this change, and you can see that the list has been added right there on the page. Pro tip: You can create a new list for your Subscribers, right here, using the A New Listfield, at the bottom of that dropdown. You will want to make sure to get this signup form out to the world, so people can use it to sign up for your mailings! You can publish the form on your website, or just share the form URL, or connect it with your Facebook business page. Step 3. Create your Welcome Email Campaign.
Alright, now we have to create the actual Welcome Email Autoresponder that will get sent out to your new subscriber. If you haven’t already, activate the Autoresponder add-on feature, and click on “Go set it up”. If you have already activated it, just click on Autoresponders at the top of the page, or under the Addons menu. Click on the New Autoresponder button and specify the details asked on that page. In this case, I’ve called it “Welcome Email”. Make sure to select the new list that you connected to your signup form, in the previous step. And, you also want to tick the checkbox that’s called “Send the first mailing immediately after a user signs up.” This way Email Marketing will always send the Welcome Email just as soon as the person signs up through your signup form. Now, create the campaign and then design that welcome email! (Hint: It’s exactly the same as composing a regular Email Marketing campaign.) When it’s all perfect, we’re ready for the next step… Step 4. Start your Autoresponder
This is the most exciting step! Now that you have your signup form set up, connected to your new list, and your Autoresponder is connected, designed and ready… all you have left to do is push the start button! You’ll see a Start Campaign button in the top right of the screen, or a Run campaign button underneath the campaign preview on the Autoresponder landing page. You’ll need to start your Autoresponder, in order for Email Marketing to send the Welcome Email, automatically. Which brings us to the last step:Step 5. Watch the automated magic!
Sit back, relax, and watch those new signups roll in. As soon as anyone signs up through your form, that Welcome Email Campaign will send to them, automatically. You don’t have to do a thing! Enjoy! Warning: These limitations apply only to Workspace email. For other limitations, see Server Email Limits.
The following limitations apply to Workspace Email accounts:
- Incoming Mail Size — There is a 30MB limit per email message you receive, including file attachments, which have a size limit of 20MB total. Messages larger than 30MB are rejected by our incoming server and a bounceback message is sent to the sender. There is no limit on the number of email messages you can receive. You should also try to keep your inbox under 20,000 messages, as having so many could limit performance.
- Outgoing Mail Size (SMTP Relay) — There is a 30MB limit per email message that you send using SMTP, including file attachments, which have a size limit of 20MB total. Messages larger than 30MB are rejected by our outgoing server and you are notified.
Note: The receiving mail server may have different size restrictions. Many mail providers and ISPs will reject mail larger than 5-10 MB.
- SMTP relays — SMTP relays let you send emails through our servers using third-party clients, such as Microsoft Outlook®. To prevent spam, we limit our email accounts to 250 SMTP relays per day. This lets you send 250 emails from your email address on a daily basis.
- Emails per folder — No one folder can exceed 330,000 emails. If you’re using IMAP with an email client like Outlook®, no folder can exceed 25,000 emails.
- Folders – An account cannot have more than 2,000 folders.
- Sent Mail Messages — To prevent spam, we limit the number of email recipients to whom you can send messages to 500 per day. There is a 200 per minute sending limitation as well as a 300 per hour sending limitation. Any distribution lists are expanded to their actual recipient lists and any duplicate addresses in a single email are removed. For additional information, please contact customer support.
- Outgoing Mail Size — There is a 30MB size limit per email message, which includes file attachments. Meaning, your message cannot exceed 30MB in size, including the size of your file attachments. File attachments have a size limit of 20MB total.
- Number of Addresses — There is a limit of 100 addresses on a single email message. The 100 addresses may be included in any combination of the To, CC, and BCC fields. If there are more than 100 total addresses, the Compose window shows an error and the message is not sent. You must revise the recipient list and then resend your message.Counting recipients: WebBased Email expands any distribution lists and aliases to their actual recipients. Any duplicate addresses in the To, CC, and BCC fields are removed.
- Address Book — You can add up to 10,000 contacts to your Address Book.
- Address Book Importing — You can import up to 2,000 contacts at one time to your Address Book.
- Distribution Lists — You can add up to 100 contacts to a single distribution list.
Push email automatically sends new data to an email client or mobile device. This includes email, calendar, and contact updates.
Only our Hosted Exchange Email plans support push email.